Size Comparison
48×48 vs 64×64 vs 96×96 LEGO Mosaic: Which Size Should You Choose?
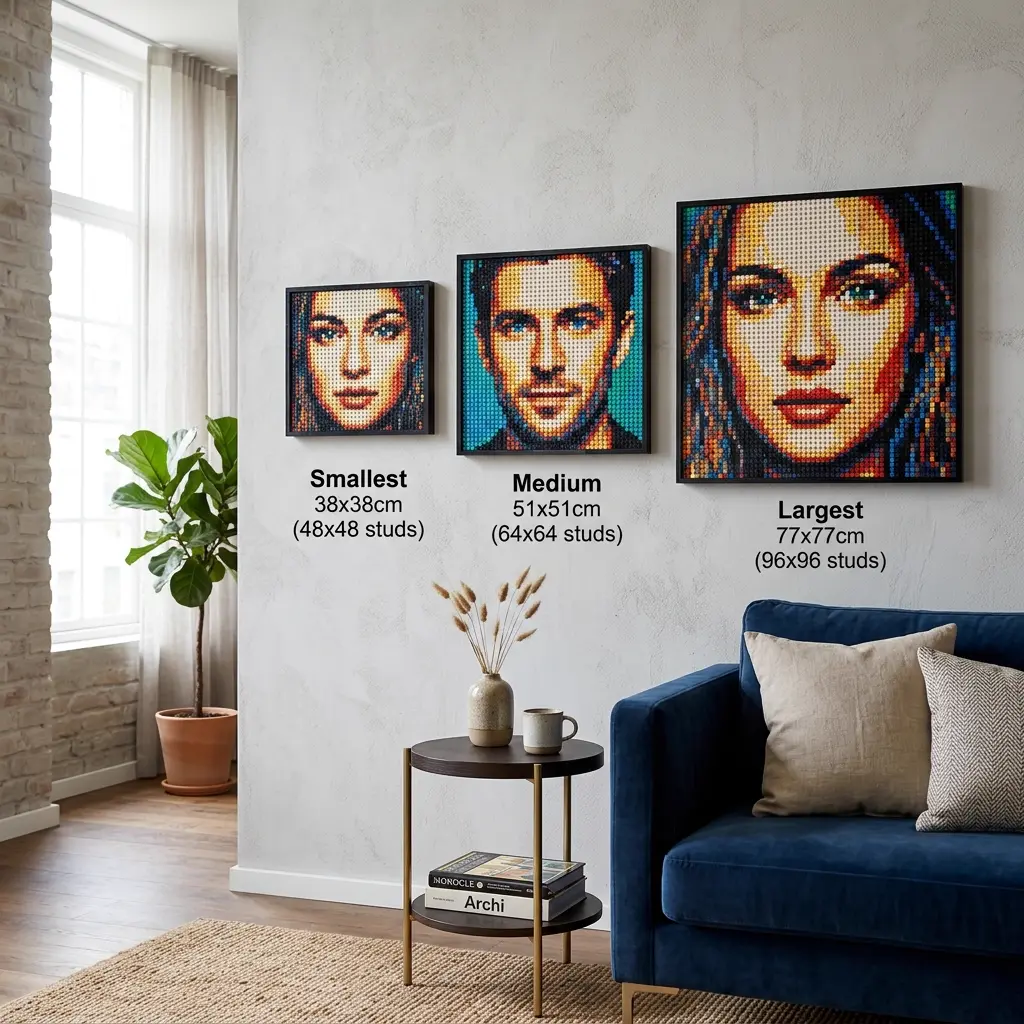
Choosing the right mosaic size is the fastest way to control cost, detail, and build effort. A 48×48 board is compact and practical, a 64×64 board is the portrait sweet spot for many photos, and a 96×96 board is a serious wall-art project that needs a strong subject and a real display plan.
Direct answer: Choose 48×48 for simple subjects at 2,304 pieces, $138.24 via LEGO Pick a Brick 3024 plates or $69.12 via Webrick 3024 plates. Choose 64×64 for most portraits at 4,096 pieces, $245.76 via LEGO or $122.88 via Webrick. Choose 96×96 only when the image needs wall-art resolution: 9,216 pieces, $552.96 via LEGO or $276.48 via Webrick.
Best for: Builders deciding between a compact keepsake, a main portrait, and a large display piece before they lock crop, cost, and sourcing route.
Avoid: Skip the 96×96 jump if the photo has weak lighting, tiny faces, a noisy background, or a room that cannot comfortably display a 77 cm square mosaic.
Recommended setup: Start at 64×64 for most face-forward portraits, drop to 48×48 for graphic pets or tight budgets, and move to 96×96 only when extra detail improves the subject rather than the background.
Best Starter Size
48×48 keeps the budget and build time low while still giving simple subjects enough room to read clearly.
Most Flexible Portrait Size
64×64 adds 78% more pieces than 48×48 and is usually where faces, pets, and couple portraits become safer.
Largest Commitment
96×96 costs four times the pieces of 48×48, so it should be reserved for images that truly use the extra resolution.
48×48 vs 64×64 vs 96×96 size and cost table
These costs are recomputed from the current runtime catalog using 3024 square-plate prices: LEGO Pick a Brick at $0.06 per piece and Webrick at $0.03 per piece.
| Size | Pieces | Parts cost | Build time | Best photo fit | Display role | Difficulty |
|---|---|---|---|---|---|---|
| 48×48 | 2,304 | $138.24 LEGO / $69.12 Webrick | 3-5 hours | Pets, icons, single tight portraits | Desk, shelf, small wall | Beginner |
| 64×64 | 4,096 | $245.76 LEGO / $122.88 Webrick | 5-8 hours | Most portraits, couples, graduation photos | Primary wall portrait | Intermediate |
| 96×96 | 9,216 | $552.96 LEGO / $276.48 Webrick | 12-20 hours | Large wall art, group photos, detailed scenes | Statement display | Advanced |
How each size changes the finished result
A 48×48 mosaic works best when the subject is already simple: a pet face, bold graphic crop, logo-like object, or one face with strong lighting. The lower piece count keeps the project approachable, but tiny facial detail can disappear if the crop is not tight enough.
A 64×64 mosaic is the safer middle ground because the extra 1,792 pieces usually improve eyes, hair edges, and skin transitions without turning the project into a major installation. This is the size to test first for most gifts and home portraits.
A 96×96 mosaic should be treated as wall art, not as a default upgrade. It gives complex scenes more room, but it also quadruples a 48×48 project. The best reason to choose it is subject detail that remains meaningful from normal viewing distance.
Photo type recommendations
For pets, 48×48 can be strong when the face fills the frame and the eyes are readable. For human portraits, 64×64 is usually safer because faces need smoother value transitions. For group shots or room-scale decor, 96×96 gives the composition enough space, but only if the source photo is sharp and uncluttered.
If a size decision feels uncertain, crop first and price second. A tight 64×64 crop often beats a loose 96×96 crop because it spends pieces on the subject instead of the background.
Cost breakdown
The size cost gap is linear with piece count, but it feels nonlinear in the real build. A 96×96 board uses 9,216 pieces, which is four 48×48 projects. Even with Webrick at $276.48, the project still requires enough time, storage, sorting, and wall space to justify the larger plan.
The table uses 3024 square-plate route data because it is the most common mosaic baseline. If you switch material style, rerun the project in BMBrick before ordering because round-tile route availability and price ranges differ.
How to turn this comparison into a real decision
The fastest way to misuse a comparison guide is to treat it like a ranking chart and ignore the context of the actual project. The better approach is to decide what matters most for this specific build first, then let the comparison answer that narrower question. Start at 64×64 for most face-forward portraits, drop to 48×48 for graphic pets or tight budgets, and move to 96×96 only when extra detail improves the subject rather than the background. If the project has a deadline, practical simplicity usually matters more than theoretical perfection. If the project is open-ended and highly personal, precision may deserve more weight than convenience.
A smart next step is to run one realistic test image all the way through the decision lens described above. Do not compare abstract possibilities forever. Compare one image, one crop, one likely room or gifting context, and one honest budget. That is where the trade-off becomes concrete. Once the decision is tied to a real image instead of a hypothetical one, the "best" option usually becomes much clearer.
- Define what you care about most before comparing the options: realism, ease, cost control, or room feel.
- Test one real image or project instead of debating the category in the abstract.
- Choose the option that reduces the biggest risk for this build, not the option that wins the most categories on paper.
If you want to pressure-test that choice from another angle, read How Many Pieces? and Choose the Right Photo. Those follow-up guides usually reveal whether the current decision still holds once source image, palette, or room context becomes more specific.
Use BMBrick to test size before buying parts
BMBrick lets you compare crop, size, material style, and route estimate before export. That matters because size is not only a price decision; it changes whether the subject reads, how long the build takes, and where the finished mosaic can live.
For a real project, upload the image once, test 48×48 and 64×64 first, then try 96×96 only if the preview shows meaningful detail that smaller sizes cannot preserve.
FAQ
Is 48×48 big enough for a LEGO mosaic portrait?
48×48 can work for a single face, a pet, or a graphic subject when the crop is tight and the lighting is clear. It uses 2,304 pieces, which keeps cost and build time manageable. It is less forgiving for group photos, full-body portraits, and subtle expressions because there are fewer studs available for eyes, skin transitions, and hair detail.
Why is 64×64 often the safest portrait size?
64×64 gives 4,096 placements, which is enough room for most face-forward portraits without making the project feel oversized. Compared with 48×48, the extra pieces usually improve eyes, mouth shape, hair edges, and background control. It costs $245.76 through LEGO 3024 pricing or $122.88 through Webrick 3024 pricing in the current catalog.
When should I choose 96×96?
Choose 96×96 when the mosaic is meant to be a statement wall piece and the image truly benefits from 9,216 pieces. It is useful for group photos, complex pets with detailed fur, or room-scale decor. It is not a good automatic upgrade for weak photos because the added pieces can simply enlarge background noise.
How much do 48×48, 64×64, and 96×96 mosaics cost in parts?
Using current 3024 square-plate data, 48×48 costs $138.24 via LEGO Pick a Brick or $69.12 via Webrick. 64×64 costs $245.76 via LEGO or $122.88 via Webrick. 96×96 costs $552.96 via LEGO or $276.48 via Webrick. Shipping, storage, and display hardware are separate planning variables.
Should I pick size before choosing square plates or round tiles?
Pick a likely size first, then test material style. Size controls the number of placements and the physical presence of the artwork. Material style controls texture, palette behavior, and sourcing. If the image fails at the chosen size, switching from square plates to round tiles will not usually solve the core readability problem.
Where To Go Next
Use these guides to pressure-test the size decision from cost, photo, and sourcing angles: